Backing up data is essential and many of us often don't do that until it's too late. This post aims to reduce that risk among Windows users. Mac fans should check out this post on Time Machine instead.
There are many Windows backup options, but I like the built-in File History tool and Macrium Reflect. They are practical and, most importantly, don't cost anything.
File History is sort of like Time Machine is to Mac OS. "Sort of" because it doesn't allow for backing up and restoring the entire system, but just specific files and folders. That is where Macrium Reflect fills in.
This post will walk you through both of these practical applications. You can use them on any computer running Windows 8, Windows 10, or Windows 11.
Dong's note: I first published this post on March 28, 2018, and updated it on January 24, 2022, with up-to-date, relevant information.
Windows backup: What you need
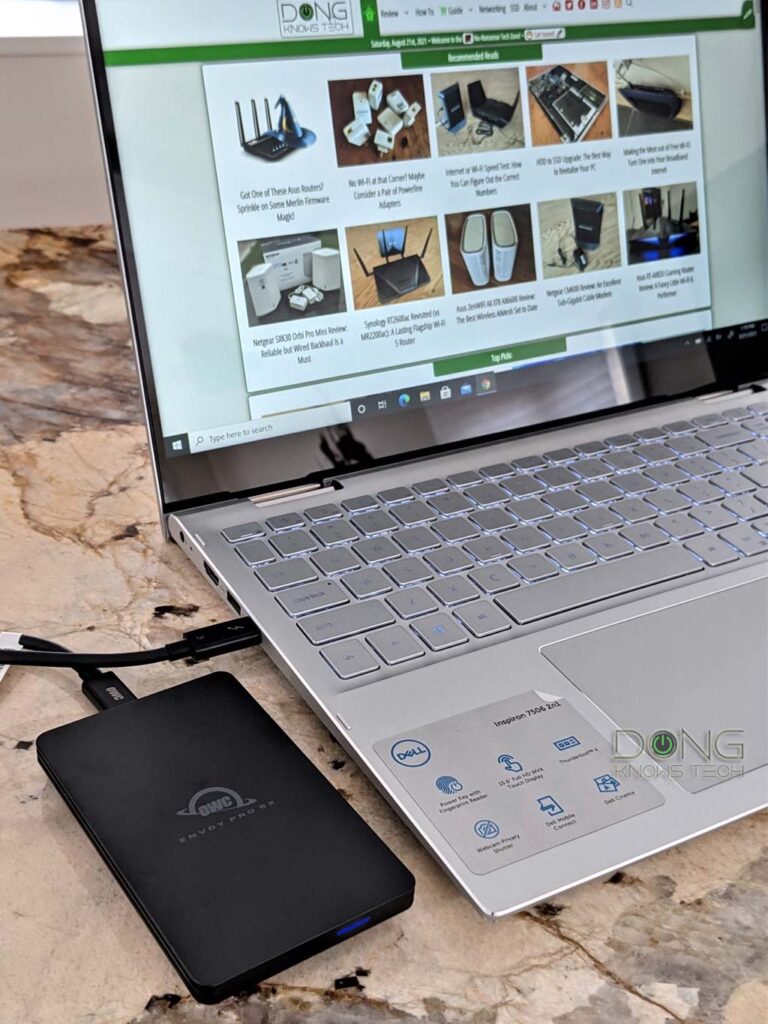
To back up your computer, you'll need a second storage device. This can be a secondary internal drive, an external hard drive like the WD My Passport, or a NAS server like the Synology DS220+.
If you choose a secondary internal drive or an external USB/Thunderbolt drive, things are straightforward. You only need to plug the drive into the computer's peripheral port, and you'll get a letter drive to access it. If you need more help, this post on file systems and how to format a drive will help.
However, if you use a NAS server, you will need to know how to access the shared folders or map a network drive. In that case, this post on how to turn a router into a mini NAS server is a good place to start.
In any case, make sure the extra storage is ready to be used as the backup destination before continuing. I used an external drive with D as the drive letter for this post.
Windows backup: File History
File History is part of Windows (starting with Windows 8), meaning you won't need to install it. However, this post generally applies to those using Windows 10 or Windows 11.
File History: Backing things up
There are many ways to use File History, but the following steps are applicable in all supported Windows versions.
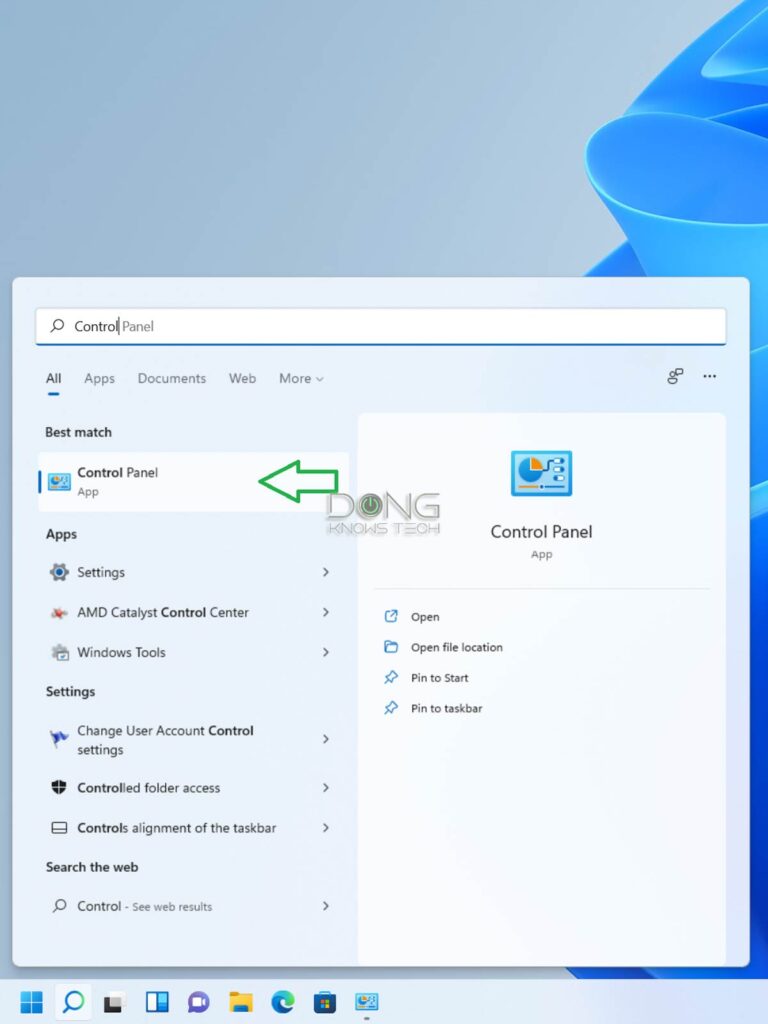
1. Call up the Control Panel: You can search for it on the computer's Start Menu.
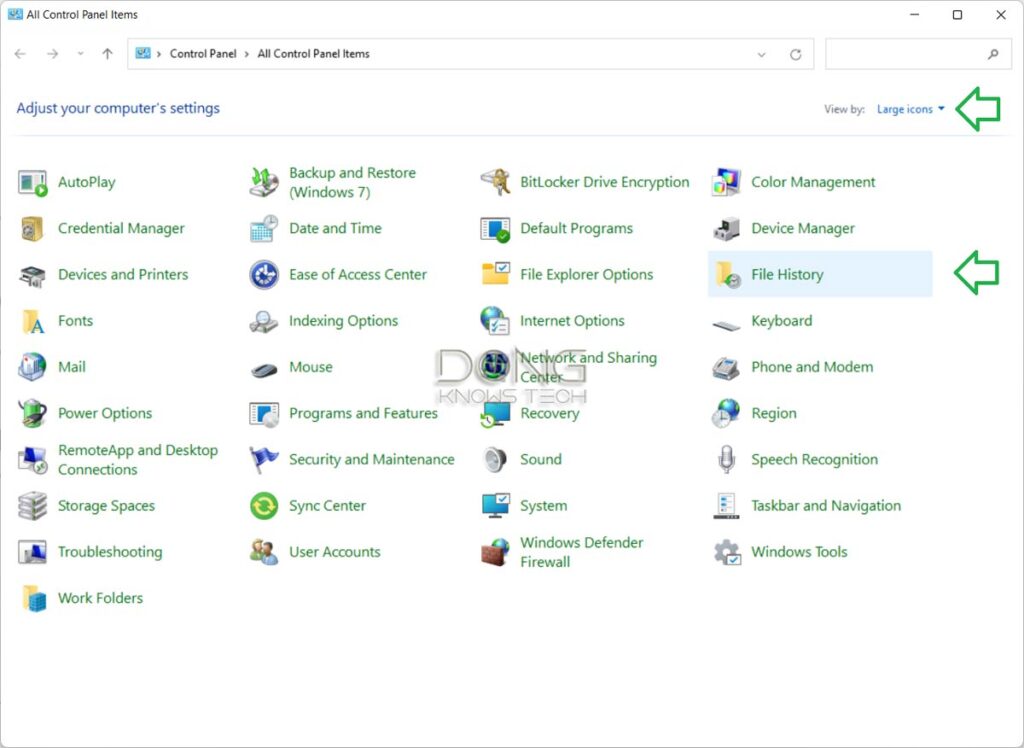
2. Switch the value of "View by:" to "Large icons," then click on the File History item.
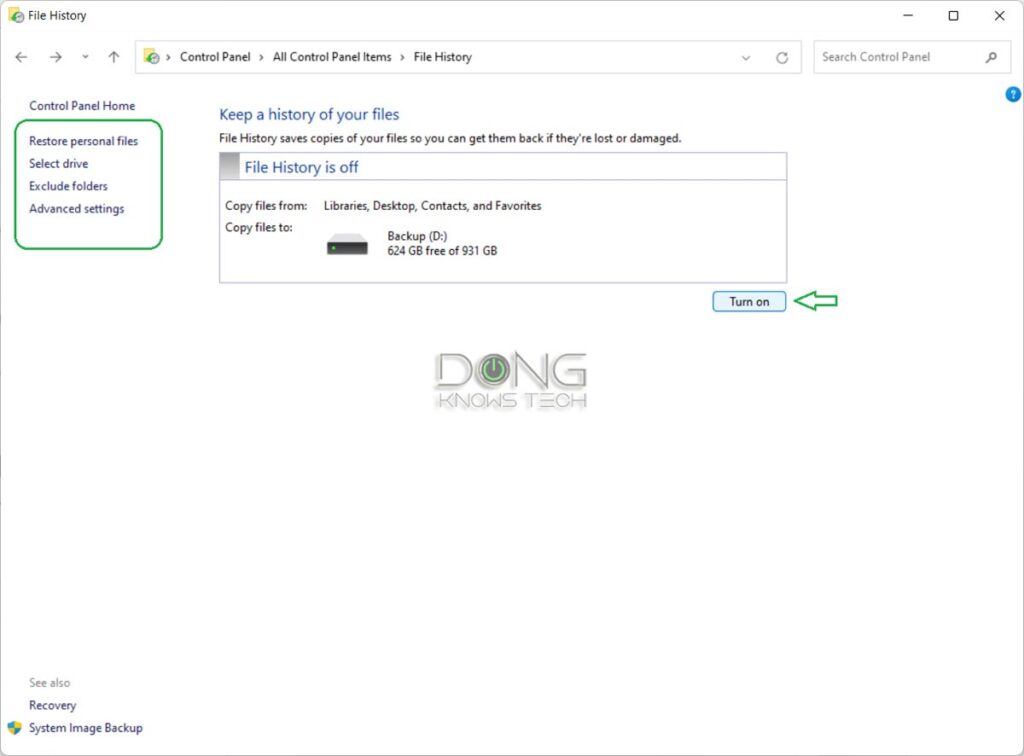
3. Turn File History on for the backup destination (the D: drive in this case) by clicking on the Turn on button.
And that's it. If you want to do more, you can customize your backup as the following:
- Restore personal files: Restore your data from a backup—more below.
- Select drive: Use this to choose a different backup destination, including a network location.
- Exclude folders: Add or remove folders within the computer to the backup scheme. Again, by default, all sub-folders of the user profile are selected, you can remove which you don't need to back up and add other folders.
- Advanced settings: This section includes a few options:
- Save copies of files: This is the backup frequency which ranges from every 10 minutes to once a day. The more frequent the backup, the more versions of the data you'll get, and the more storage the backups will use. For example, if you choose 10 minutes, that means you can undo the changes you've made to a file in the past 10 minutes. Generally, 30 minutes or an hour is a suitable frequency.
- Keep saved versions: This is the backup retention. You can choose to keep the backup forever, until space is needed, or up to a certain amount of months. Generally, six months are plenty. Or you can choose one month to conserve the storage space.
From now on, Windows will automatically back up the selected folders onto the backup drive without you having to do anything. Just make sure the backup destination is available—don't unplug the drive, that is.
File History: Restoring files
It's straightforward to restore files using File History. Here are the steps:
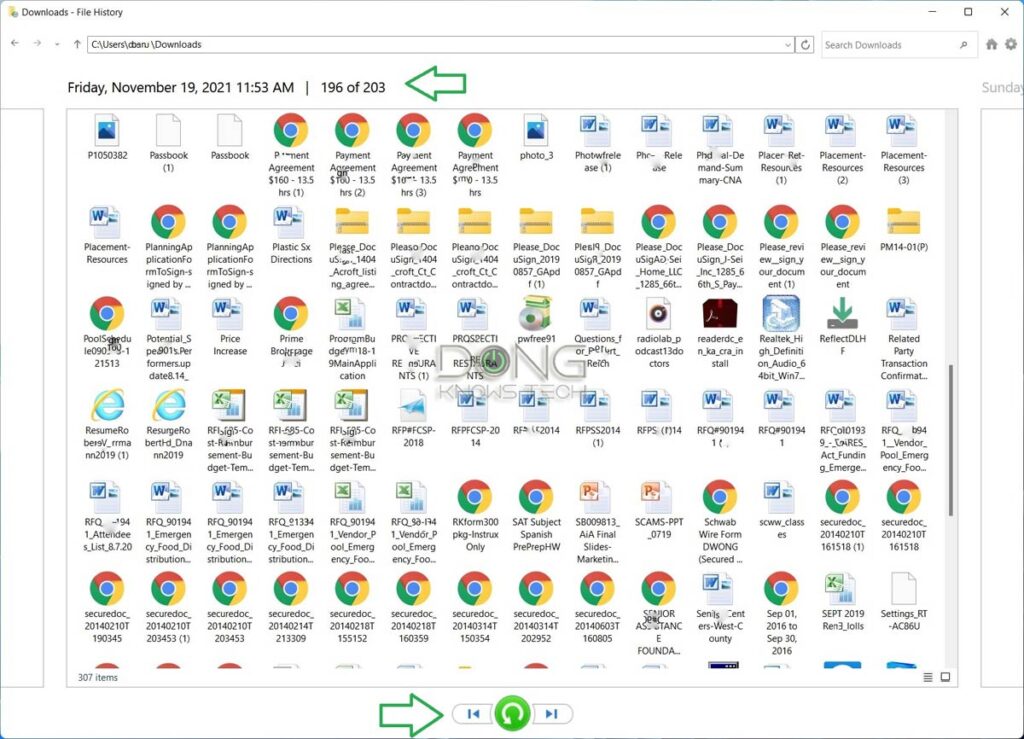
- 1. Open FIle History (step #2 above) and choose to Restore personal files. A window will pop up to show the latest version of the backed-up data.
- 2. Use the left and right arrows to move between different versions. Double click on a folder to view its content.
- 3. When the version of a file or folder is found, you can:
- Restore the entire version. In this case, click on the restore button in the middle of the arrows.
- If you just need to restore one file or folder, click on it to select it—use Ctrl+Click to select multiple items—and then use the restore button.
Important note: If you want to keep the existing and restored versions, make sure you rename the current items beforehand. Else they will be overwritten.
Macrium Reflect
Apart from being a handy tool to clone a drive, Reflect is also an excellent backup software. With Reflect, you can restore the entire system to a previous point.
You need this kind of recovery when your machine is infected with a virus or its hard drive dies. You should make a Reflect backup before making a significant change to the system, like upgrading to a new version of Windows.
Prepare the software and your computer
I did these steps using version 8 of the software, but the interface is similar if you use an older version, 7 or 6.
- Download and install Reflect. You can use the free version.
- Get yourself a small thumb drive.
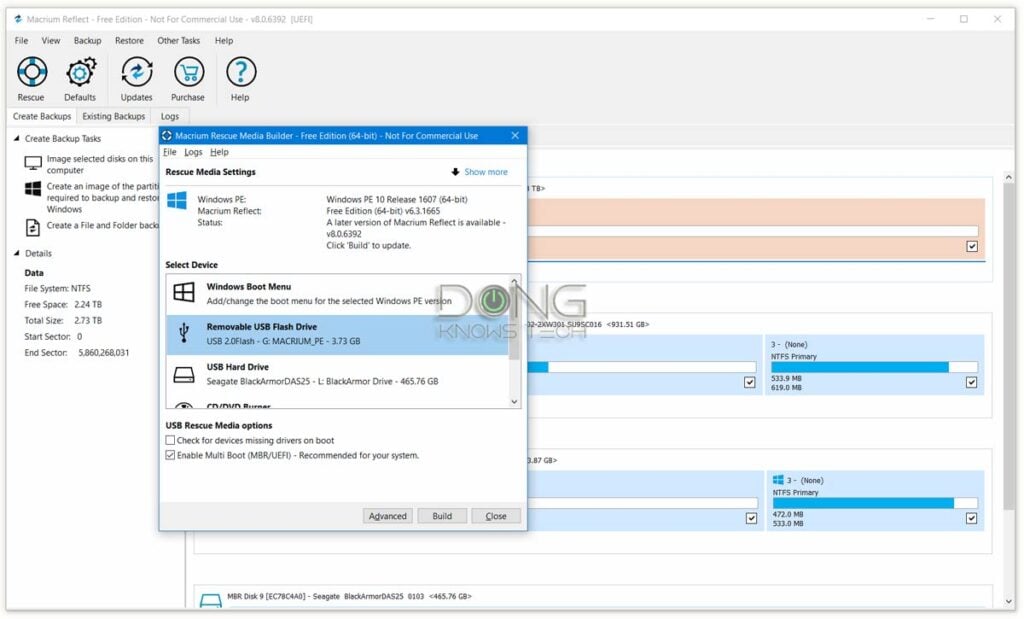
- Run Reflect then click on Other Task and then on Create Rescue Media, then follow the wizard to turn the thumb drive into a rescue disk. Keep it safe. You'll need this disk to restore your computer in case its internal drive dies.
- Click on Other Task and then on Add Recovery Boot Menu Option. Follow through with this wizard and use the Windows PE menu (64 Bit) as the menu option. (Any of other menu options are OK, too). This will add an option to boot your computer into Reflect recovery mode each time you start Windows.
And that's it. Your computer is now ready.
Macrium Reflect: Backing up the system
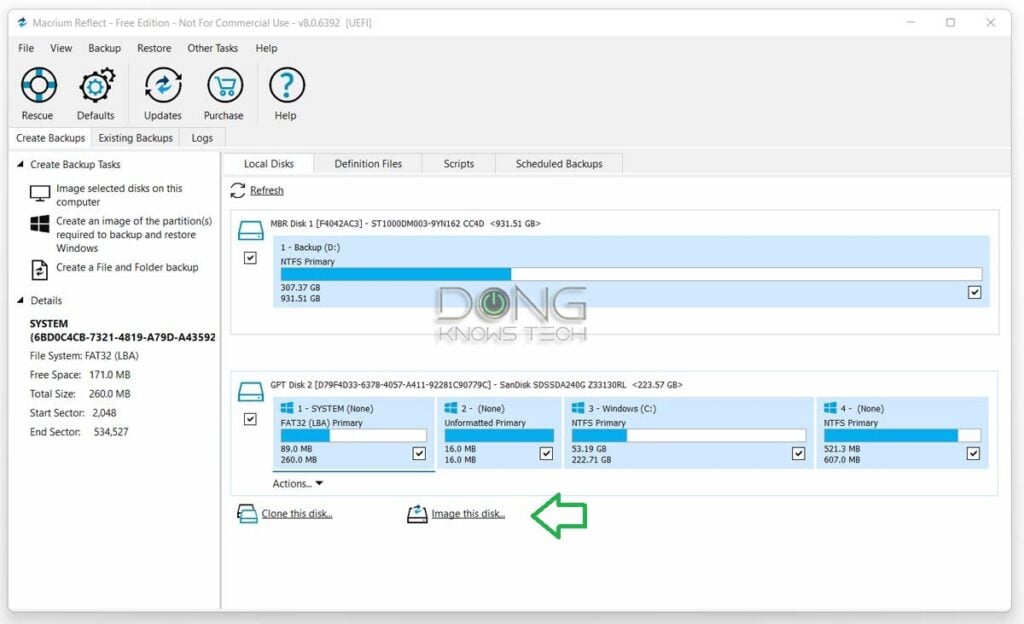
- Run Reflect; the software will scan and display all connected drives. Click on the drive you want to back up—generally, this is the main drive of the computer, one with the C: partition on it—then click on Image this disk.
- In the next window, pick the location for the backup file—an external drive or a network share folder. By default, the software will use the serial number of the drive as the name of the backup file. If you want to name it manually, uncheck Use the image ID as the file name box and type in the name of your liking. Click on Next.
- In this window, you have the option to create a backup schedule that will run by itself in the future. The free version only offers full and differential backup. A differential backup captures only the changes made since the previous full backup. Create a schedule if you want, then click on Next.
- Click on Finish. You'll be prompted to save the backup option, which you should do if you have picked a backup schedule in step #3. If not, uncheck the Save Backup box and click on OK. The backup process will start and will take a while to complete, depending on the amount of data you have.
And that's it. Now the backup will run. If you choose to schedule future backups, that will run, too, at the dates and times you have picked.
Macrium Reflect: Restore
Depending on your situation and needs, there are many ways to restore a Reflect backup image.
Restoring individual files or folders
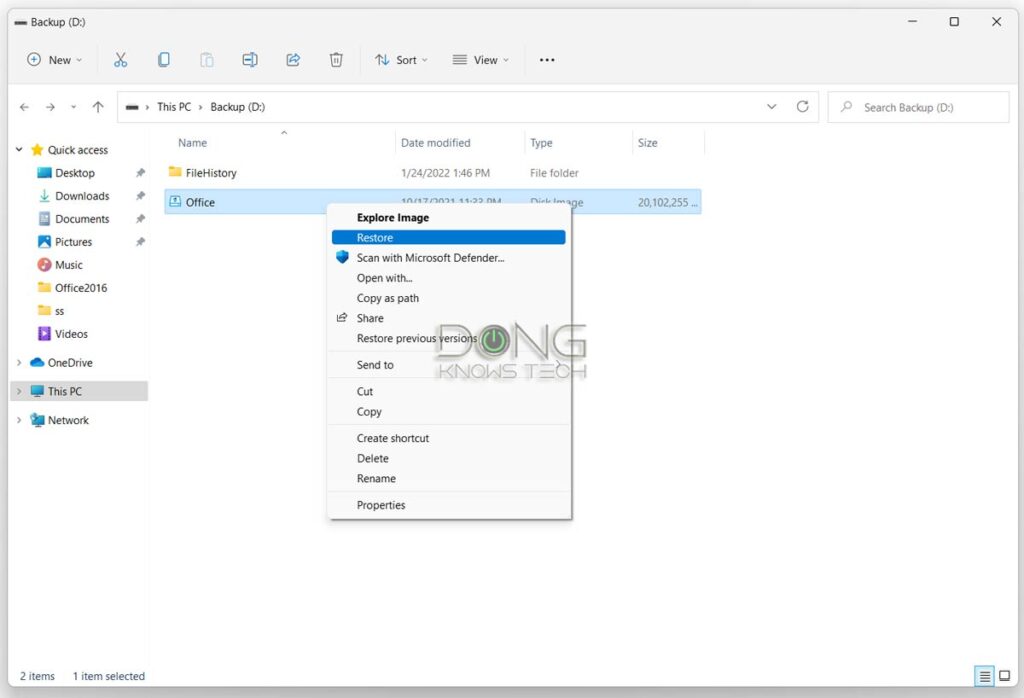
- Locate the backup image file, which you set in step #2 above.
- Right-click on the file and then on Explore image.
- Select the partition(s) within the image you want to explore, then click on OK.
- Now each partition you've selected will mount as a drive to your computer. You can copy any file or folder out of it. After that, right-click on the drive letter of the mounted drive and choose Macrium Reflect -> Unmount Macrium Image. The image will also be unmounted when you restart the computer.
Restore the entire system
You would choose this type of restoration to bring the system back to a previous point. Generally, you do this when the machine is messed up, infected with a virus, or you need to replace its internal drive.
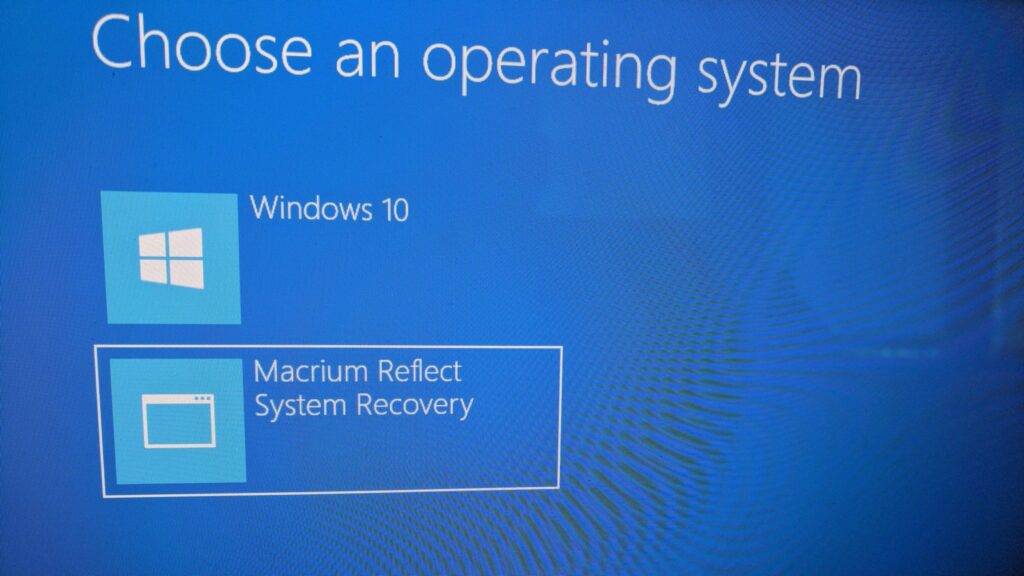
- Depending on the situation, there are three ways to start Reflect for this type of restoration:
- If your computer still works, just run Reflect like any other program.
- If your computer has issues—like you can't boot into Windows --, but its drive is OK, you can boot into the Recovery Mode (assuming you have completed step #4 in the Prepare the software and your computer part above). To do this, as your computer boots up, select Macrium Reflect System Recovery. Reflect will launch automatically.
- If the computer's internal drive no longer works and you need to restore to a new drive, the rescue boot disk is required. Boot into your computer using that disk, and Reflect will launch automatically.
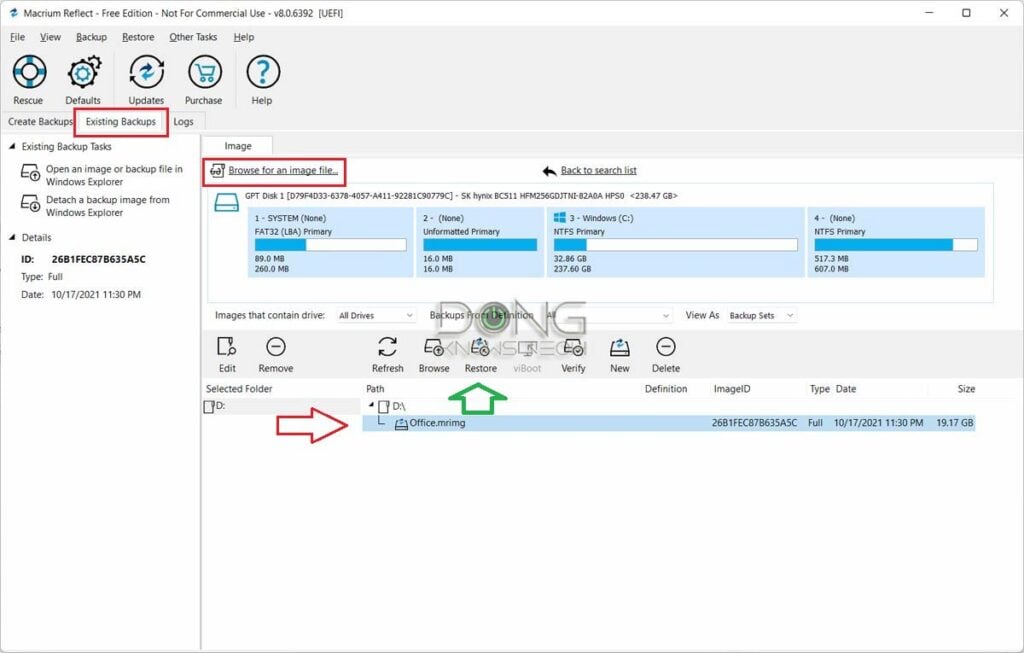
2. Once Reflect launches fully, go to the Existing Backups tab. You should see a list of backup image files that you've made. If not, you can click on Browse for an image file and locate the backup file.
3. Select an image file and click on Restore.
4. Click on Select a disk to restore to, and pick the target disk. Generally, this is either the computer's primary drive or the new replacement drive.
5. Click on Next and then on Finish. Then wait for the process to complete.
Note that the restoration will erase all existing data from the target disk.
The takeaway
The are many options to perform a Windows backup for your computer. Some have more features but might incur some costs.
Macrium Reflect itself has premium options with more features.
No matter what you use, it's almost crucial that you have some backup for your data. It's like insurance. You hope you never have to resort to it, but when you have to, you'd feel so lucky that you can.
Do it!


Just letting people know that Macrium no longer offers a free version.
That’s next year, Mark, and only no more updates, the existing versions will still work.
Love your content, awesome help for all level people. You may be aware, but I just learned that you can install the free Active Backup for Business (ABB) package on a Synology NAS like the DS220+ to backup various clients and centrally manage to some degree. I have the paid home version of Macrium Reflect and it is rock solid, but I see Gartner survey feedback rating ABB very well. I plan of using both products as I always like having a plan B just in case. ABB also seems easy to use from my initial use backing up a PC but it also backs up other plaforms. Thanks for all you do Dong.
Glad you figured things out, Don. ABB used to require a paid license then Synology changed its mind, for the better.
The cost of free software is the lack of tech support. For something as important as backup, it makes sense to pay for software so that tech support is available.
File History is part of Windows, Michael. If you buy Windows, you get support for any of its features. But if you read this post carefully, chances are you won’t need any support. 🙂
After I upgraded my “unauthorized” PC to Win 11 using your instructions (thanks!), it seems that using File History is a bit different than on Win 10. I use Reflect 8 Home on this computer to image its drive on a regular basis to a Synology DS220+, and was thinking of using Reflect instead of File History for daily individual folders/files backups when I came upon this post. It looks like Reflect may be the way to go, but are you aware of any downsides to switching to Reflect (other than first needing to turn off File History in Windows)? If I do switch, should I first clear (delete) the File History backups from my NAS before doing so? Thanks!
They are two different types of backups, Tom. But you can use both. The only issue you have is the storage space. You can also use Synology Drive in the place of File History.
I would appreciate just one clarification of your reference to Synology Drive in your comment above, please. I understand that the Synology Drive Server would need to be installed on my NAS. However, I’m a little unclear about the rest of the setup as it relates to my PCs and Synology Drive Client software.
Specifically, I have two computers, each of which has several files that I would like to be synced to each other if possible, as well as be “backed up” to the NAS. Also, if it makes any difference, each machine has two separate accounts (one for me, one for my wife). Would I need to add a Synology Drive Client to each of my two machines, in addition to installing the Server on the NAS? I’m asking because I didn’t see client software listed anywhere on the Synology Packages web page. Should I assume it’s included in the Synology Drive Server package? If it is, I am uncertain how I would install the client on my two computers. My apologies for the request for clarification.
Check out this post, Tom.
Yours is the second recommendation I’ve seen of Macrium Reflect software. Should it be used in place of Synology’s backup and restore software on a DS220+ to create disk images of my 2 home PCs? Also, would it be prudent to upgrade from the MR free version, or would that be overkill for a home network?
Yes, Tom. And the free version is fine.