Time Machine is an excellent backup tool for any Mac. However, by default, it keeps all backup versions until the backup destination, be it an external drive or a storage server, is full.
This practice can be wasteful, and eventually, you’ll have no space for other uses, like storing files. It’s especially problematic when you use a backup server. Since one Mac can hog all the storage space, you’ll end up having nothing left for other computers and services.
That said, it’s a good idea to limit the amount of storage Time Machine can use.
Determine the OS version and suitable backup limit
Before you can fix Time Machine’s storage, you first need to determine what version of macOS you’re running.
(If you don’t know how, check out this post, which also gives you some other handy Mac skills, including how to run Terminal, which you’ll need to use in this post.)
After that, find out the amount of storage you need for the backups. Generally, you want to use 150% or more of your Mac’s internal drive capacity.
So, for example, if your MacBook has 128GB of internal storage, 300GB of backup space is generous. But pick a number that suits your needs. The more storage space, the more versions of backups you’ll get, which means the further you can go back in time.
Limit Time Machine backup size in macOS 10.12 and earlier
This trick is easy to implement and for sure works on macOS 10.12 (Sierra) and older versions. Note that you need to log in with an administrator account.
Here are the steps:
- Convert the storage limited you want into megabytes. So if you’re going to use 300GB, then the number you have is 307200 since 1GB = 1,024MB.
- Run Terminal (you can search for it using Spotlight at the top right corner). Type in this command, then press Enter:
sudo defaults write /Library/Preferences/com.apple.TimeMachine MaxSize 307200
You’ll be likely prompted to enter your account’s password, so do that and press Enter again. And that’s it! From now on, Time Machine on that Mac will automatically delete old backups to make sure it uses no more than 300GB.
If you want to revert to the default value (no limit), run this command:
sudo defaults delete /Library/Preferences/com.apple.TimeMachine MaxSize
Limit Time Machine backup size in all versions of macOS
If you run the latest macOS (10.13 Mojave or newer), the command above won’t take effect. Instead, you’ll need to limit the storage space at the destination side, be it the external drive you plug directly into your Mac or a Time Machine-supported NAS server.
By the way, since you make changes to the backup destination, this method will work on all macOS versions. But it does take a bit more work.
Limit Time Machine backup size of an external drive
The idea here is to create a separate partition on the external drive and use that partition exclusively for Time Machine backup. For that, you turn a single hardware drive into two different volumes (or logical disks) and use one for Time Machine.
Note: Doing this will erase all drive content, so make sure you’re OK with that.
Here are the steps:
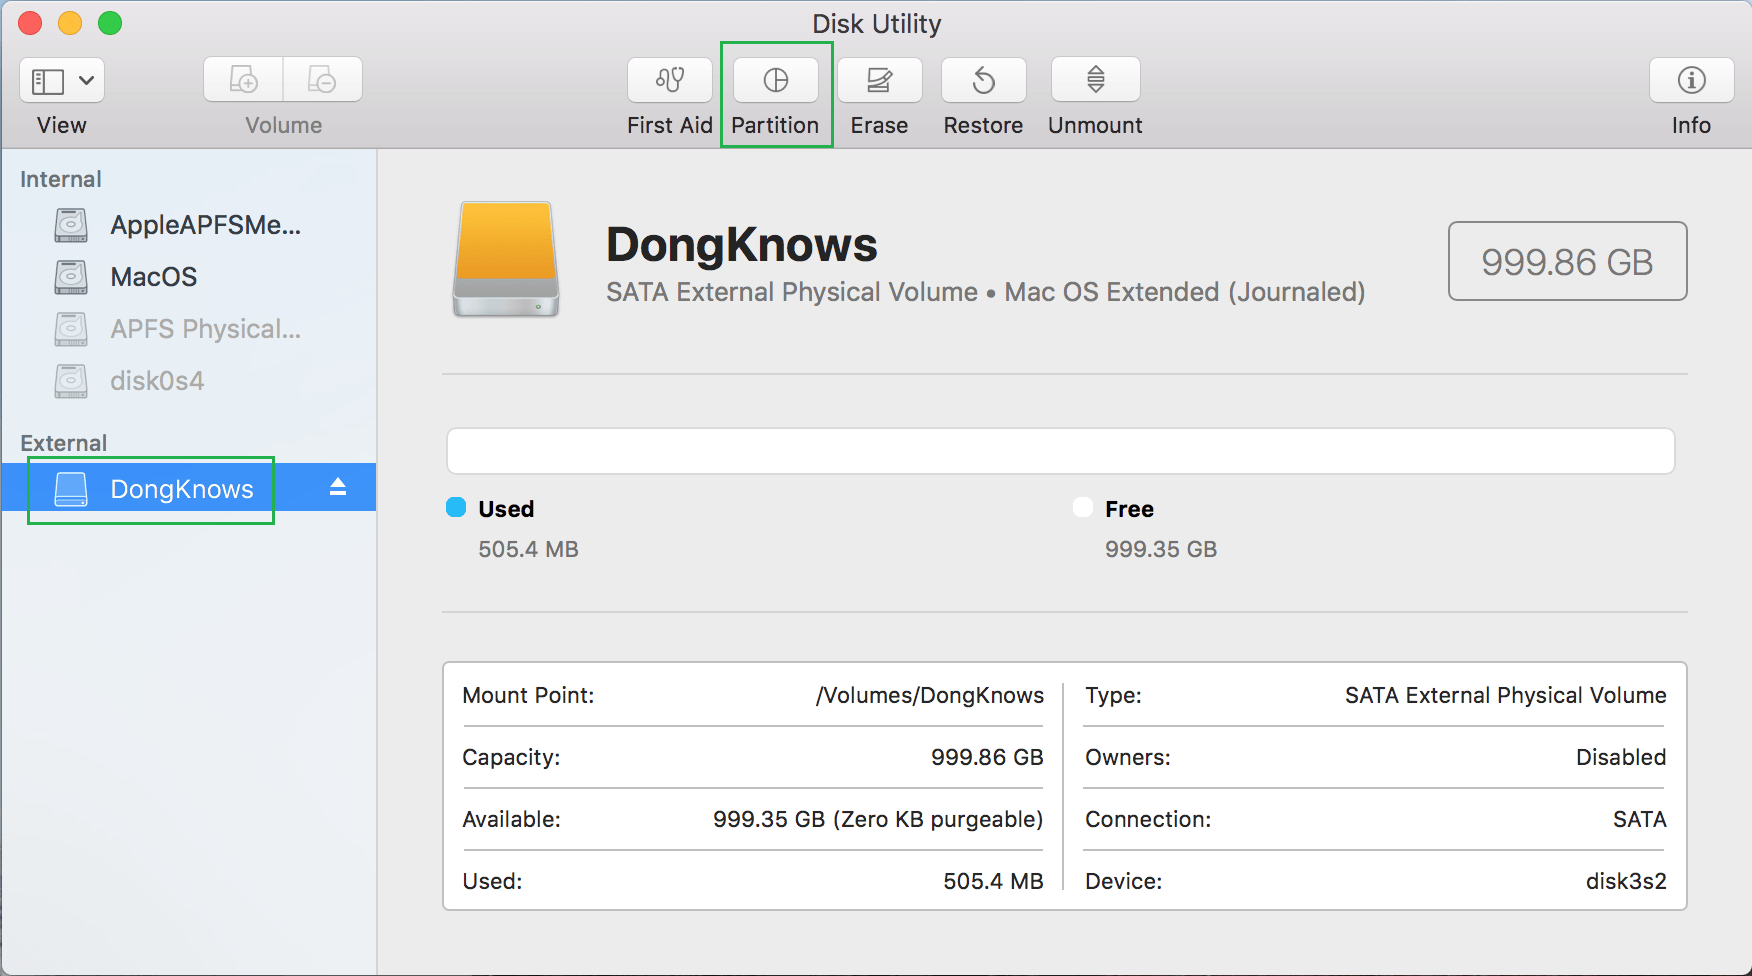
1. Connect the external drive you want to use for Time Machine to your Mac and call up Disk Utility (you can find it using Spotlight). In Disk Utility, select the drive, then click on Partition.
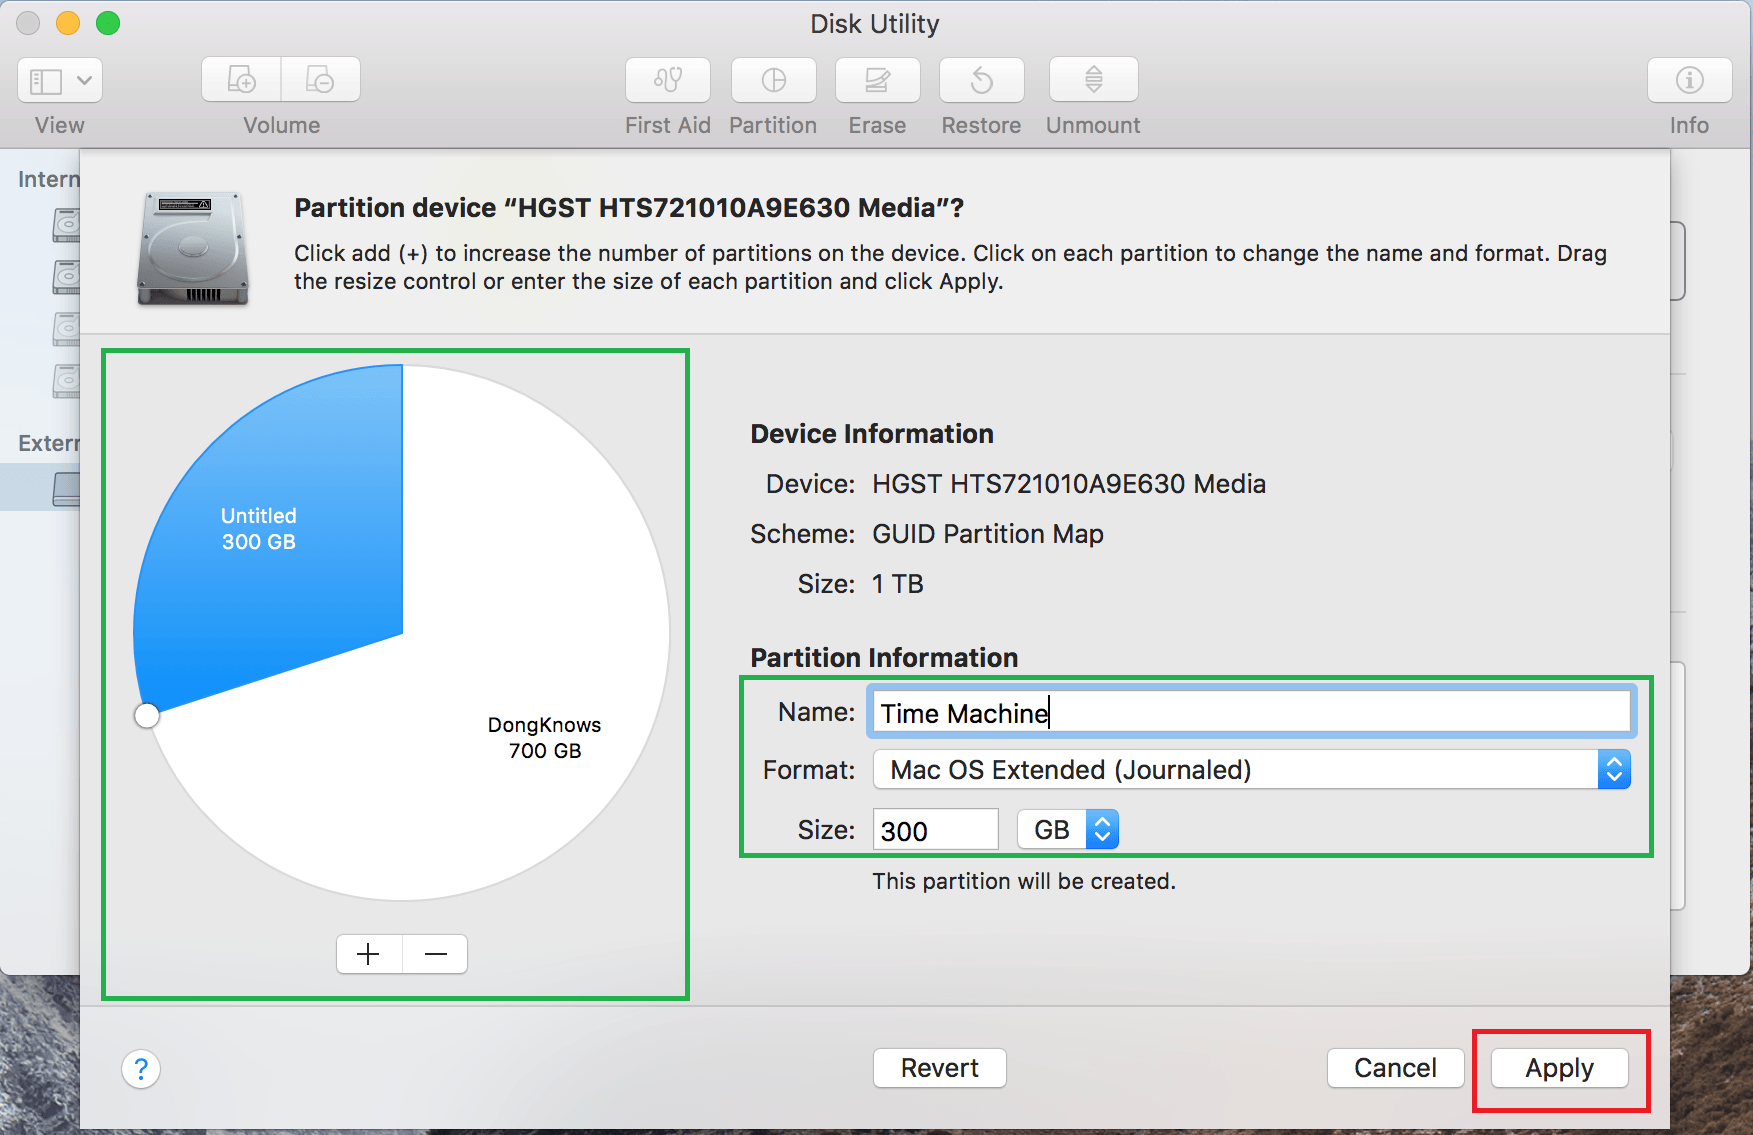
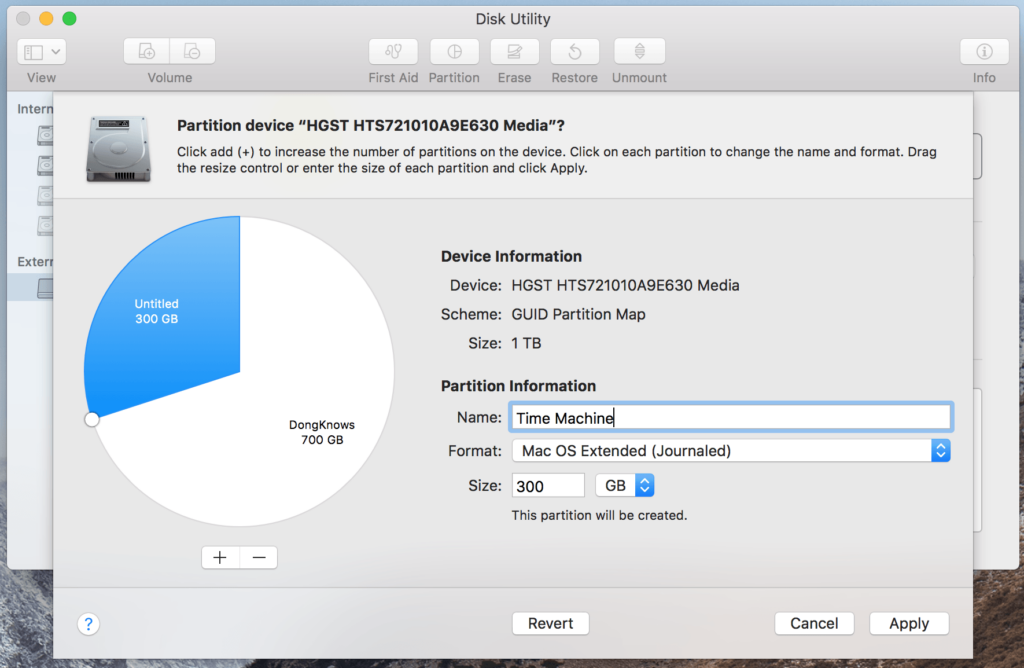
2. Click on the Plus (+) to add another partition to the drive, then pick the Name, Format, and Size for the new partition. (For this example, I named the new partition Time Machine, used Mac OS Extended (Journaled) as the format and 300GB as its size.) Then click on Apply.
By the way, if you’re curious as to what file format to use. Here’s the breakdown:
- APFS only works with Sierra (10.12) or later.
- Case sensitive means files of the same name but different letter cases (i.e., MyFile.txt vs. myfile.txt) exist as two separate files.
- Encrypted means data stored on the drive can be encrypted, use this if you intend to store sensitive data on the drive. The catch is if you forget the password, you’ll lose the data.
- macOS Extended Journaled (a.k.a HFS+) works with all Mac OS versions and will not work with Windows.
- exFAT works with both Windows and Mac but does not support Time Machine backup.
- MS-DOS (FAT) is an ancient file system, and generally, you shouldn’t use it.
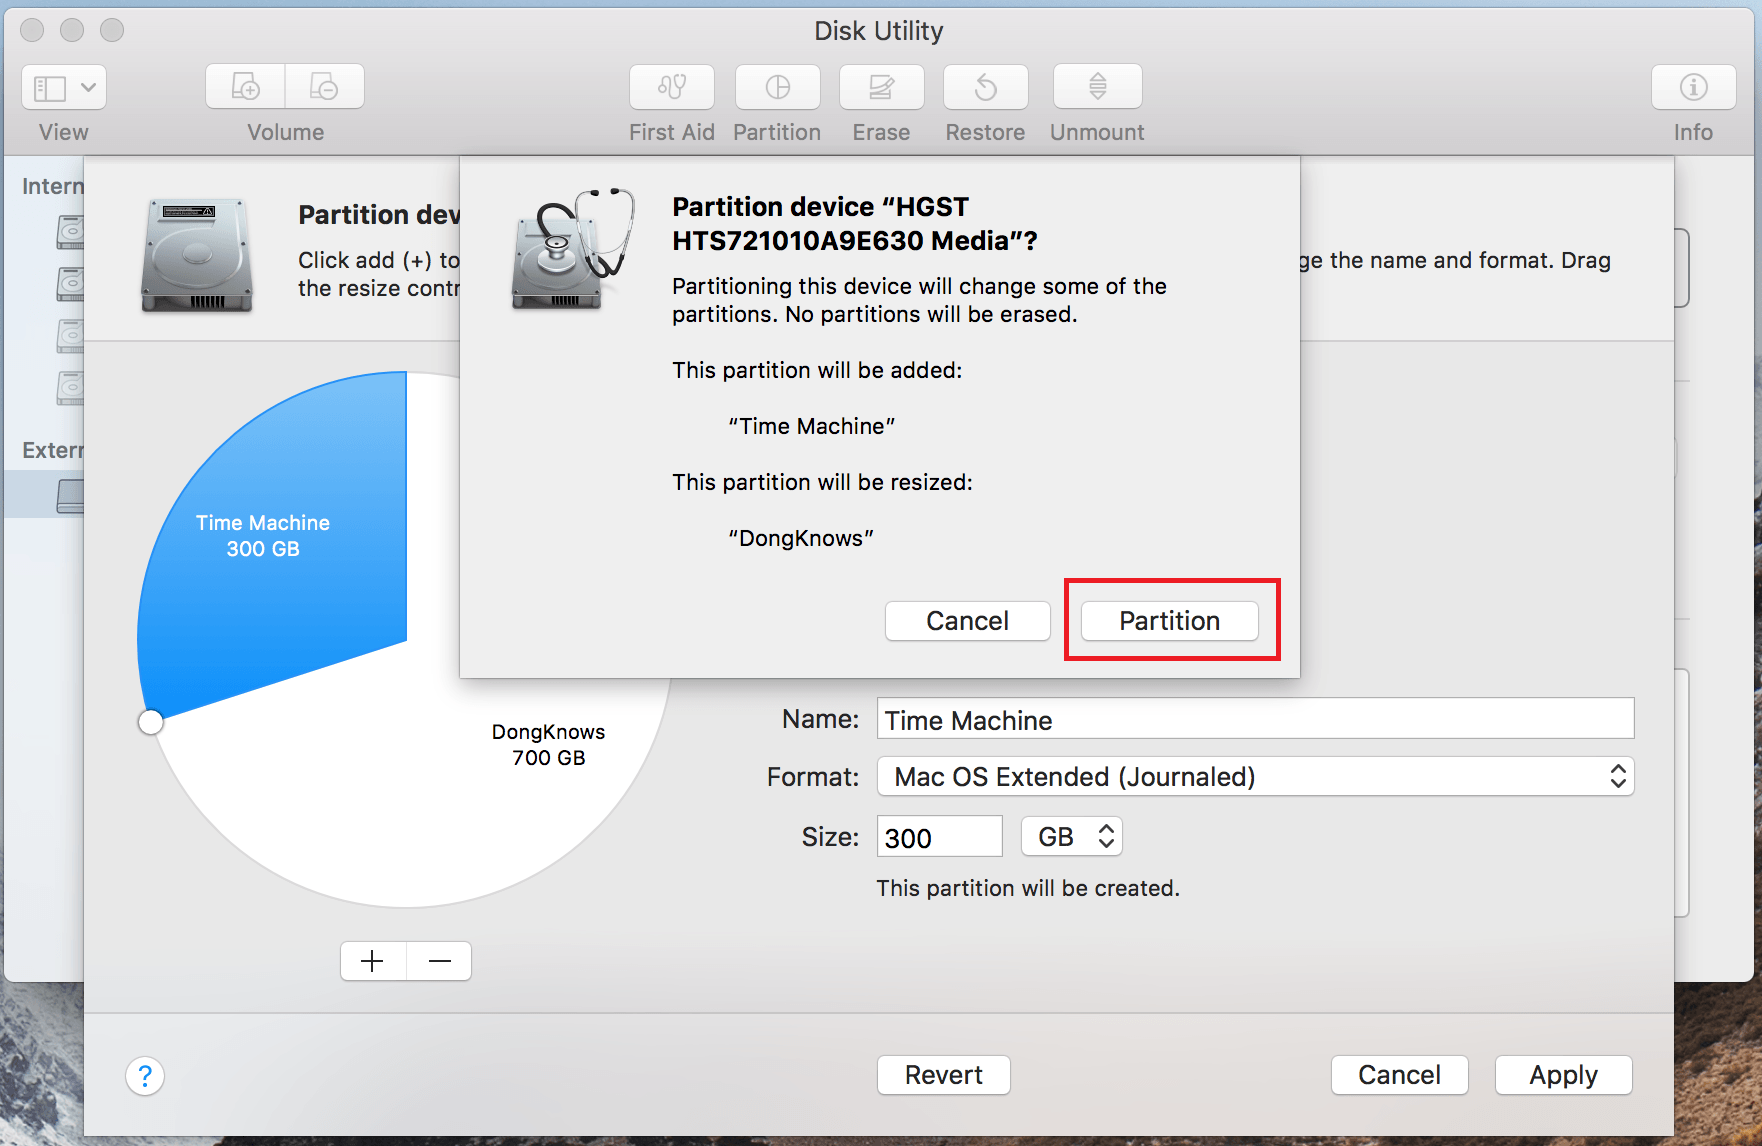
3. Confirm the action by clicking on Partition. The drive will then have two partitions. One of them is 300GB, and the other has the rest of the drive’s storage space.

4. Run Time Machine (again, you can use Spotlight to call it up) and use the newly created partition as the backup destination.
And that’s it! You can now use the other partition for file storage; Time Machine will never touch it. By the way, if you use a Time Machine-supported router, such as the Asus RT-AC86U, this method works, too.
Limit Time Machine backup size on a NAS server
This part depends on the NAS you use. Similarly, you can create a separate volume and use it exclusively for Time Machine. Some servers also allow for setting a storage limit (quota) for an existing shared folder.
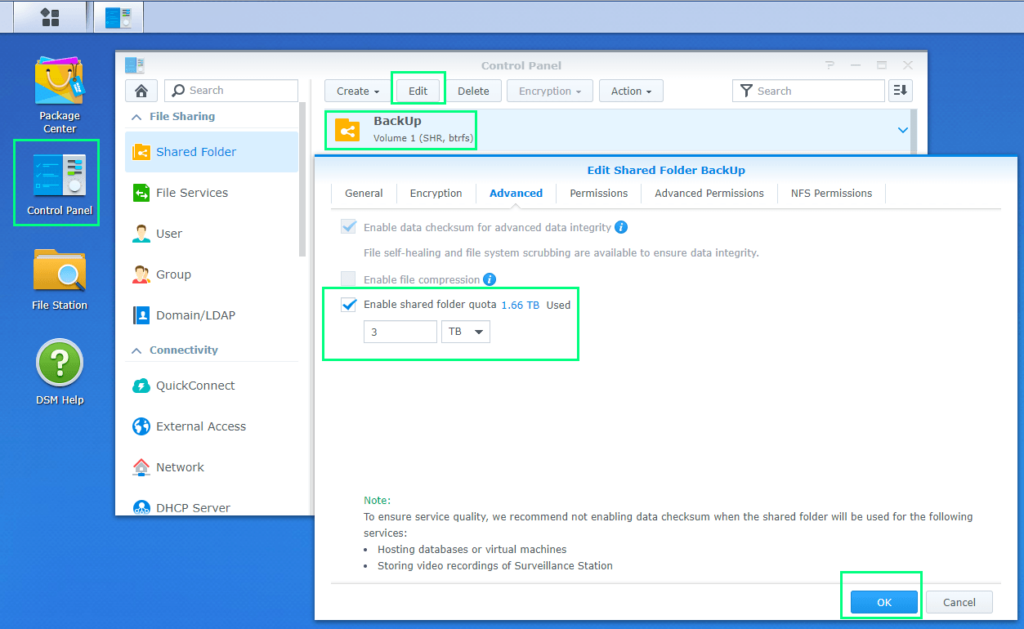
If you happen to use a Synology NAS server, like the DS1618+ or the DS1019+, which I would recommend over any other NAS brand, you can easily do this by editing a shared folder within the Control Panel.
Remember that the folder share quota is only available when you use the NAS with the btrfs file system.
Dong’s note: This post was originally published on Mar 21, 2018, and has been updated.


One additional tip;
If you are using another Mac (ie if use your older Macs as file servers), you can also use this method below to limit your folder shared for TM on the destination Mac:
https://support.apple.com/en-bn/guide/mac-help/mchl31533145/mac
I use this on an old Drobo, which serves as a nice TM backup device for all my Macs in my home network. By using this method, you don’t need to partition your storage, and effectively can adjust your storage space allocation on the fly without losing your backup.
The Drobo BeyondRaid (or SHR if you use Synology) will also allow you to expand overall storage space of your Raid, and because it has parity, you can be protected if 1 or 2 drive fails.
Obviously new NAS like the Synology already have these kind of features built in, but I thought others would like to know that they can do this when recycling the old Macs/storages.
Cheers, and Dong, haven’t seen you on Cnet, etc for some time! Miss your authoritative humor!
Thanks for the tip, which I actually mentioned in the latter part of the post. Drobo is by far the worst storage device one can use. Among other things, it’s super slow. Avoid it!
The partition method is t working for me on OSX 10.14. I can partition the drive(s) sections in disk utility, any they appear there, but they do not appear in under select disk in Time Machine preferences.
It works, Dan. Make sure you use the correct file system.
Thank you for your reply Dong,
I am on OSX/MacOS 10.14.6.Drive formatted as GUID partition map in Mac OS Extended (Journaled). And it still doesn’t show up in time machine “select disk” only under a sparse bundle in disk utility. I am thinking it me be do to by drive is an Apple Time Capsule 2TB. I know these drives behave differently, ie you can not hook them up via usb and use an an external. I am wondering if this is my problem
Thanks
Dan
Apple Time Capsule is a network-attached storage device, Dan, and can only work as such. More on NAS here. Please pay attention and use devices correctly. You can’t just make assumptions and ask questions hoping things turn out OK. 🙂
In any case, the TC is really old. You should consider a NAS server or a better router.
Hi, I use OS 10.9.5 and the command you suggests in Terminal returns this message:
sudo: unable to stat /etc/sudoers: Permission denied
sudo: no valid sudoers sources found, quitting
What might the diagnosis be?
Or is there a way around this issue: partitioning an external drive always makes the “ignore ownership” checkbox disappear for the backup drive, making it impossible to transfer the backup files to a different drive. I really would like to be able to dump the backups created in my traveling drive to the main backup drives at home.
Thank you,
Make sure you login with an admin account Angjeezu.
My issue is that once a disk (or partition) gets full, things slow down drastically. If I could keep time machine running at about 60% of the capacity of the drive or partition, that would make me happier. Any chance I am mistaken about the partition? If there I partition the drive to 60/40, will it allow for faster work when the partition is full, because the drive is not?
No, Tee. That’s because when the disk is full, Time Machine needs to clean up the old backup versions as it writes the new ones. I’d just format the drive and start from the beginning. For this reason, it’s good to use two backup drives alternately.
USB external hard drives are now huge and cheap. Just get yourself a 4TB external hard drive and let Timemachine do its thing.
I second that.
Jonny, I think it depends on what you intend to use the TM backup for. For me, I want the backup mostly just to restore my computer from in case of failure, or to install onto a brand new computer. And I’ve also started noticing my backups slowing to a crawl as the backup size increases (“Cleaning Up” takes forever). So I’ve decided to start limiting the TM backup size just to keep it streamlined.
Then, with a NAS or even a cloud-based service (perhaps NAS-to-NAS?) I plan on doing more long-term backups of the more critical files using something like Synology’s Cloud Station Backup.
Yes, very informative. I had a RAID server 9T drives and well when I hired movers apparently it got lost. I should have kept it in the carl..I will never get over it. Anyway, Im using time machine with a 2T drive. My question is, when you limit time machine I am assuming it starts overwriting or does it remove the oldest files or does it stop? Im assuming the partition for Time machine when its limit is reached it will back up the most recent and remove the oldest files.
Is that true?????????
That’s correct, Leif. It’ll start recycling the storage space by deleting the oldest backups.
Thanks, it is very informative
Thanks for the response. FYI … I’m backup up to a NAS (Synology DS216+) and use TimeMachineEditor to limit the number of backups taken by Time Machine.
On a Synology NAS, you can just limit the share folder size, Erik. Just “Enable Share folder quota” for the share you use for Time Machine. Or you can create a separate volume. For the former, though, make sure you use btrfs file system (which you should anyway.)