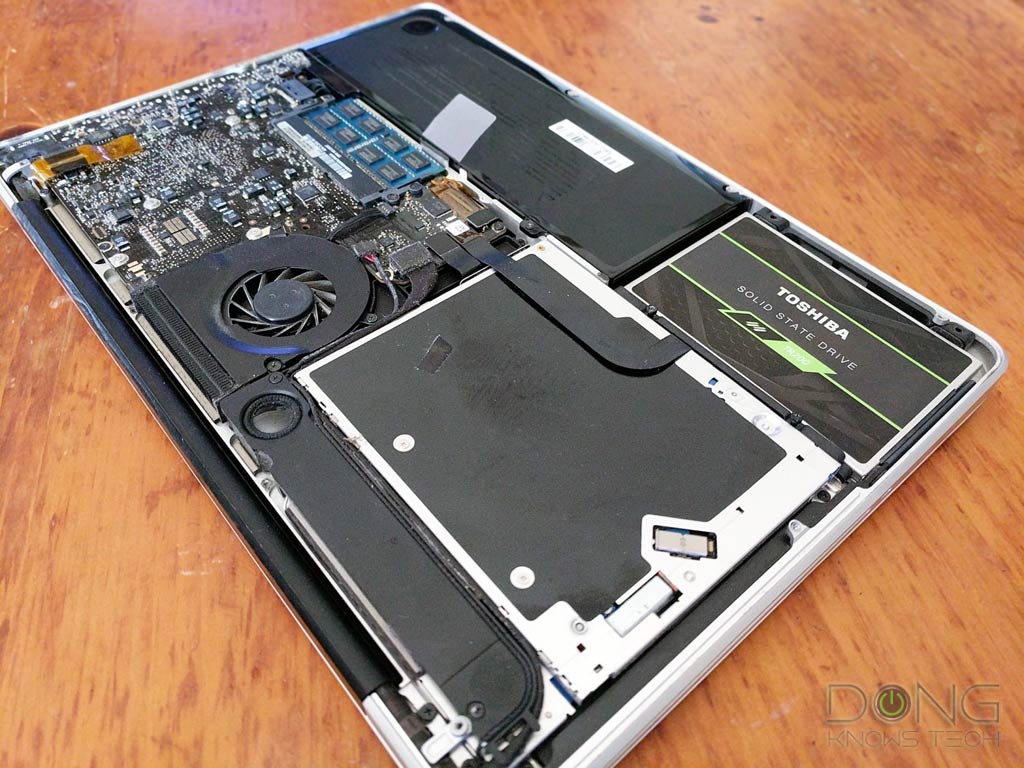
An SSD upgrade is quite simple. All you have to do is make a clone of an existing drive to a solid-state drive. Then physically swap the former out for the latter.
The process will help the computer perform much faster—if it initially uses a hard drive as its primary storage—without having to reinstall or re-activate any software.
By the way, you can also follow the steps below to replace an existing drive with one of a larger capacity, hard drive, or SSD.
Note that this guide is about standard SATA drives, such as the Samsung SSD 860 Evo or the Crucial BX500. If you’re looking to upgrade your computer to an NVMe SSD, check out this post.
Also, it’s a good idea you have a good understanding of file systems and partitions before continuing. Especially if you’re using a Windows computer.
Dong’s note: I originally published this post on March 4, 2018, and last updated it on November 20, 2018.

SSD upgrade: When to do it
I’d recommend doing this on any HDD-based computer, new or old, running Mac OS or Windows. If you have an aging machine, this is a sure way to make it run much better than when it was new and extend its life significantly.
By the way, if your computer takes longer than 40 seconds to boot up or a few seconds to launch an application, it likely runs on a hard drive. You can also listen to it; a hard drive spins and makes mechanical sounds.

SSD upgrade: What you need
No matter if you use a Windows or a Mac computer, you will need three things for the job.
- A replacement (target) drive: This drive needs to have a larger capacity than the amount of data already on the original (source) drive. For example, if you have a 1TB hard drive with 100GB of data on it, you can clone it to a 120GB SSD without any problem. However, for best performance—especially with SSDs—the primary (boot) drive of a computer needs 30 percent or more of free space. Also, if you can afford it, a high-capacity drive is always better than a lower-capacity one.
- An adapter to connect the replacement drive into a computer, such as a SATA-to-USB adapter. (If you use a desktop, you can use another internal connector instead).
- Cloning software. In this post, I’ll recommend two free applications that work very well.
SSD upgrade: Drive cloning on a Windows computer
I recommend Macrium Reflect for home users, which is by far the best cloning/backup software, in my opinion. And since it doesn’t cost anything, there’s no reason you shouldn’t use it. You should use it instead of your new SSD’s bundled software if there’s any.
Here are the steps:
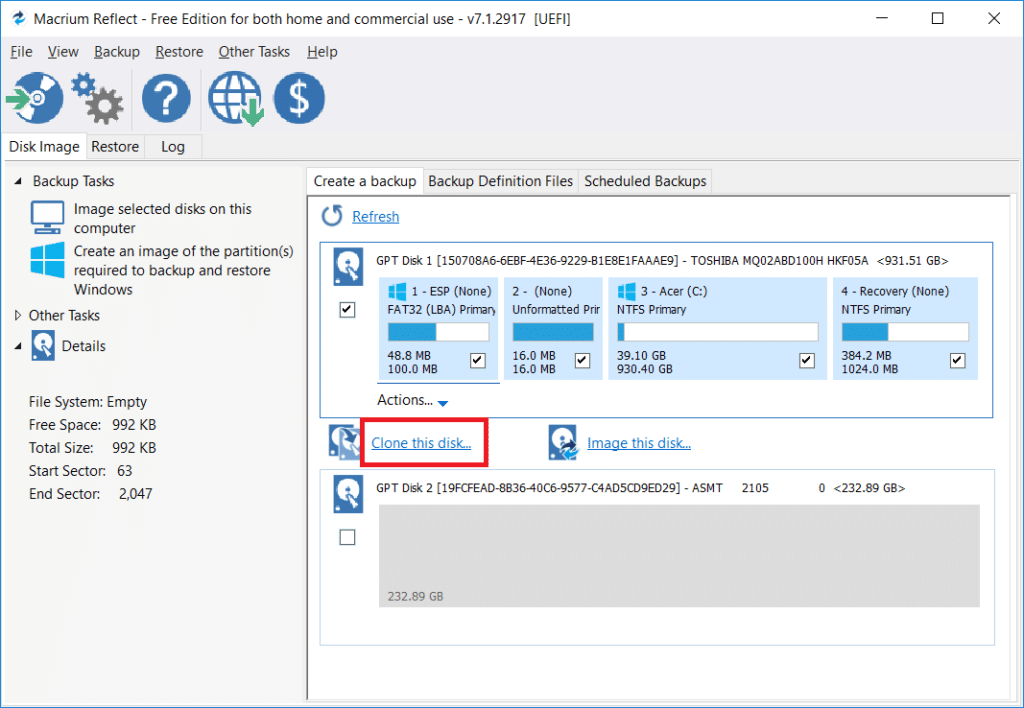
1. Download and install Macrium Reflect, then plug the replacement drive into the computer using the adapter, or via a secondary internal desktop connector. Run the software; it will take a few seconds to scan your computer and then display the list of available drives.

2. Under the drive that you want to clone (your existing drive), choose “Clone this disk…”, then click on “Select a disk to clone too…” and select the replacement drive (the new drive).
Note: If your target drive is of lesser capacity, you won’t be able to select all the partitions of the source drive. In this case, you’ll only need to choose the primary (C:) partition plus those on its left, and uncheck the rest of the partitions.

3. Click on Finish, then follow through with the rest of the wizard and wait for the cloning process to complete. This process can take a while, depending on the amount of data on the original drive.
Note: If you choose to clone to a larger (target) drive, the partitions’ sizes (of the old drive) will remain the same after the cloning process. In other words, the new drive will appear as though it had the same capacity as the old one you replaced. In this case, you will need to expand the main one to take over the empty space. Use can do this using Windows’ drive Manager or a third party tool, such as Partition Wizard from MiniTools.
SSD upgrade: Drive cloning on a Mac
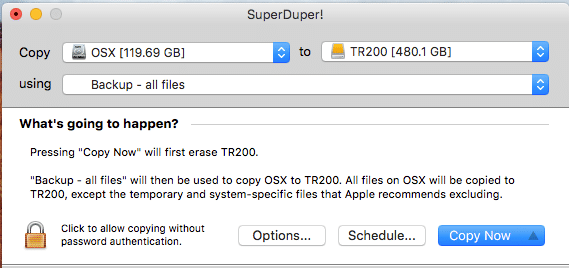
On Mac computers, the best cloning software is SuperDuper! from Shirt Pocket. You’re encouraged to buy it, but the trial version will get the job done. Make sure you get the latest version or at least the versions that work with your current macOS.
- Plug the new (replacement) drive into the computer using the adapter.
- Run “Disk Utility” (search for it using Spotlight) and format/erase the new drive into “OS X Extended (Journal)” (or APFS if you use macOS High Sierra or later) partition.
- Download and install SuperDuper!
- Run “SuperDuper!” and choose to “Backup – all files” from the Mac’s internal drive onto the new SSD. Wait for the copy to complete. This process can take a while, depending on the amount of data on the computer’s original drive.

That’s it. Now you physically swap the computer’s original drive with the replacement drive. Boot your computer up, check to make sure TRIM is running, and enjoy the newfound speed.


An SSD reads and writes data to underlying interconnected flash memory chips made out of silicon. Manufacturers build SSDs by stacking chips in a grid to achieve different densities.
SSDs read and write data to an underlying set of interconnected flash memory chips. These chips use floating gate transistors (FGTs) to hold an electrical charge, which enables the SSD to store data even when it is not connected to a power source. Each FGT contains a single bit of data, designated either as a 1 for a charged cell or a 0 if the cell has no electrical charge.
Greetings Dong,
Thanks for all info on hdd to ssd migration. I tried it on an ancient desktop (MBR & SATA-2) going to a Samsung 870EVO and got acceptable results. Now I’m ready to try w/ a newer laptop (HP-250G6) that has a HDD but could take an M.2 drive if I added the HP parts (adapter & mount) for it. The drives are either/or not both. Like the desktop, the laptop is only annoying slow on boots/logins so I can live w/ the SATA “penalty” and it seems a more straightforward upgrade.
The unknown on the laptop is that it is configured to dual boot Win10 and Linux so there are NTFS and ext4 partitions on the drive. I used my backup sw on the desktop to perform its Win10-only HDD cloning successfully, would probably try the same on the laptop. Do you know of any show-stoppers for migrating a dual-boot setup? Is it mentioned in a post I missed?
You just need to clone the drive correctly. More in this post.
Thanks for posting this! I swapped out the 5400RPM hdd of HP Pavillon with a sdd and the performance improvement is quite noticeable.
Macrium worked like a charm. If you’ve never disassembled a laptop, I’d highly recommend researching and watching a video/step by step guide specific to your model.
Sure, Peter. Thanks for sharing the experience. 🙂
In Step 2, it is possible to include the partition “4 – Recovery (none)” (or any additional partitions after the main one not automatically transferred to the target) by reducing the size of the main “C” partition by a corresponding amount, then dragging it down to the end of the target.
Yes, if you make the partition’s sizes fit the replacement drive, you can bring them all over.
Will this be “plug n play” after the new drive is swapped out? Or do you have to do anything else?
You don’t need to do anything else other than maybe restarting the computer once after it has booted up with the replacement drive for the first time.